
I just love when friends come to town. It's the best reason to "be a tourist" and try activities/restaurants that I've either heard about or always wanted to try.
For Labor Day Weekend, my college roommate, Jean, came to Santa Barbara for a visit. We had so much fun!
We tried a japanese restaurant that I will not recommend to others. Ate at Fishouse for dinner and I absolutely LOVED everything about that meal. The bread before the meal, the cocktail, and the main entree. We left full and happy! We ventured to Cody's for breakfast and I would say that it's an all American breakfast (not gourmet but better quality than Denny's). And lastly, we tried the Lark for dinner. I won't be running back to this restaurant either. It was a bit overpriced and I think that the hype surrounding its opening will die soon.
We went paddleboarding, wine tasting, and beer tasting. All of which were new activities for Jean. I love exploring new activities and so does Jean...it was perfect.
But the BIGGEST project of all was the creation of a headboard. I had been wanting to reposition my bed in my room for a couple weeks but needed a headboard to do so.
With no instructions, just an iPhone, and (minimally stocked toolbox), we drove to Home Depot to create the image in my head.
Here is what we did/how it all came together...in pictures!


Here is what we did/how it all came together...in pictures!

The Supplies (3/4" plywood, 2x4s, screws, nails, and rope)
...And Home Depot cut the wood to the dimensions that I wanted

It all fit...kinda

Deciding which blanket will go best...


With no craft store in town, I had to improvise. The batting is "egg crates" from Kmart

We cut the crates to fit the plywood. And then used spray adhesive to glue everything together

Then wrapped the batting around the edges and used a staple gun to secure the batting to the back of the plywood

Next was the "fabric". With no fabric store nearby, I found a shower curtain at TJ Maxx!

We wrapped the fabric around the edges of the plywood/batting. I saved the corners for last so that I could make sure that they were tight and "clean" edges.


Next came the assembly. A couple 2x4s is how we attached the headboard to the bed frame


We screwed 2 additional 2x4s to the "stabilizer" at the bottom so that the fabric piece could be attached


And added an extra 2x4 for height

And finally, attached the fabric piece!

The Back


The Front

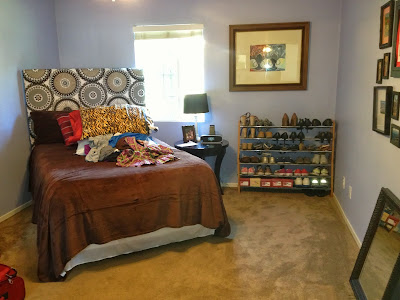
Finished!!!

My Room
(forgive the poor job making up the bed and the extra "stuff" on the bed)


Thanks for coming, Jean, and for helping out! Santa Barbara really is a great place to live (and vacation). My door is always open...and I've just about finished all of the "hard" projects, lucky for you ;)
Big thanks to Mike and Jenna for their staple gun, to Jorge (my land guy) for the power tool, and to the Home Depot workers who looked at me like I was crazy when explaining my goal but who helped me anyways. My next big purchase should either be a sewing machine, a staple gun, or a power tool.